A deck’s edges define its finished look just as much as the decking itself. Whether it’s a rough-cut rim joist showing weathered grain or a crisp fascia board wrapping the perimeter, those transitions between platform and yard tell the whole story of your attention to detail. Most builders slap on a 1×8 fascia and call it done, but that’s where opportunity lives. The right edge treatment can add visual weight, improve drainage, hide structural lumber, and create clean lines that make the entire outdoor space feel intentional.
Key Takeaways
- Deck edge ideas—like contrasting borders, integrated planters, and fascia boards—transform the finished look while hiding pressure-treated lumber and improving moisture management.
- Picture frame and inlay edge designs require strategic blocking between joists and careful installation but create a custom, intentional appearance that signals quality craftsmanship.
- LED strip lighting and recessed puck lights mounted under the deck edge enhance nighttime usability and landscape visibility while maintaining code-compliant electrical safety with GFCI protection.
- Built-in planter beds and decorative borders turn functional deck edges into living design features, with proper drainage and structural anchoring essential for weight-bearing safety.
- Cable and glass railing systems provide modern, open aesthetics while meeting IRC code requirements for 36-inch guardrails and 4-inch sphere baluster spacing on elevated decks.
- Simple contrasting color deck board borders offer an instant visual frame at minimal cost, with hidden fasteners and doubled boards creating a polished, professional result.
Why Deck Edging Matters for Your Outdoor Design
Deck edges serve three distinct functions: structural support, moisture management, and visual finish. The rim joist (the outermost framing member) carries loads from joists and deck boards, but it’s also the first place water collects and the most visible line when you’re standing in the yard looking up.
A well-designed edge hides pressure-treated lumber, which weathers unevenly and can look rough even when new. Fascia boards made from composite, PVC trim, or cedar cover that framing and shed water away from end grain, where rot starts. They also provide a mounting surface for under-deck lighting, skirt boards, or planter brackets.
From a design standpoint, the edge is your chance to add a contrasting material, shadow line, or color shift that grounds the deck visually. A floating deck without a defined edge can look unfinished, while a sharp border or built-in planter signals that the project was done with care.
Classic Border and Trim Edge Treatments
Contrasting Color Deck Board Borders
Running a contrasting deck board color along the perimeter creates an instant frame. This works especially well with composite decking, where manufacturers offer coordinating trim boards in darker or lighter tones. For example, a gray field with a walnut border adds depth without extra materials or fasteners.
Install border boards perpendicular to the main deck run, or miter the corners at 45° for a picture-frame effect. Use hidden fasteners on both the field and border for a clean look, face screws break the visual line. Budget an extra 10–15% on material since you’ll need to account for cuts and waste at corners.
One pro move: double up the border boards for a two-tone stepped edge. Lay a 5.5-inch board, then cap it with a narrower 3.5-inch board in a third color. It looks custom and hides the rim joist completely.
Picture Frame and Inlay Edge Designs
A picture frame edge runs deck boards around the entire perimeter, with field boards running perpendicular inside that border. This requires blocking between joists at the perimeter to support the border boards, since they run parallel to the rim joist and won’t land on framing.
Install 2×6 or 2×8 blocks between joists, spaced 16 inches on center, before laying decking. Use joist hangers or toe-screw them in place. The picture frame boards then fasten to both the rim joist and blocking, creating a stable, flat border.
For an inlay design, cut a channel into the field decking and insert a contrasting strip, usually a different wood species or composite color. This is advanced work that requires a circular saw with a straightedge guide, a router, or a track saw. Mark your cut lines carefully, and test-fit the inlay strip before final installation. Many advanced builders on platforms like Fix This Build That showcase tight-tolerance inlay patterns using hardwoods like ipe or cumaru against composite fields.
Integrated Planter and Garden Bed Edges
Built-in planters turn a deck edge into a living border. Construct planters from the same decking material or use rot-resistant cedar, redwood, or composite trim. Frame each planter box with 2×4 or 2×6 lumber, line the interior with landscape fabric, and drill 1/2-inch drainage holes every 8 inches along the bottom.
Attach planters to the rim joist or deck posts using structural screws or lag bolts, soil is heavy, and a 24-inch-long planter can hold 50+ pounds when wet. Space planters evenly along the edge or cluster them at corners and stairs for visual anchors.
For a seamless look, build the planters at the same height as the deck railing. This creates a continuous horizontal line and lets you use the planter caps as armrests. Fill planters with lightweight potting mix, not garden soil, to reduce weight and improve drainage.
Another option: drop the deck edge 6–8 inches and frame a grade-level garden bed around the perimeter. This works best on low-profile decks (under 24 inches high). Edge the bed with natural stone, brick, or steel landscape edging, and plant low-maintenance perennials or ornamental grasses. Detailed tutorials for building custom planter boxes often include cut lists, fastener schedules, and finishing tips.
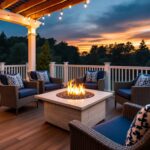
Lighting and Illuminated Edge Options
LED strip lighting mounted under the deck edge or along the fascia transforms the space after dark. Use low-voltage (12V) LED strips rated for wet locations. Run the strips along the underside of the rim joist or inside a routed channel in the fascia board for a hidden source.
Power the system with a plug-in transformer (easiest for DIY) or a low-voltage landscape lighting transformer if you’re tying into an existing outdoor lighting circuit. Always install a GFCI-protected outlet for safety, this is an NEC requirement for outdoor receptacles. If you’re not comfortable with electrical work, hire a licensed electrician for the transformer and outlet installation.
For a more dramatic look, install recessed deck lights (also called puck lights or paver lights) into the fascia board itself. Drill 2.5-inch or 3-inch holes (depending on the light fixture), insert the fixture, and wire them in series back to the transformer. These fixtures cast small pools of light downward, highlighting landscaping or steps.
Another approach: mount post cap lights on any structural posts that extend to the deck edge. These are solar or low-voltage fixtures that sit on top of 4×4 or 6×6 posts, adding ambient light and a finished cap detail. Choose lights with at least 20 lumens output for functional lighting, not just decorative glow.
Railing and Barrier Edge Solutions
When the deck is elevated more than 30 inches above grade, the International Residential Code (IRC) requires a guardrail at least 36 inches tall, with balusters spaced no more than 4 inches apart (measured with a 4-inch sphere). The railing itself becomes the dominant edge treatment, so material and style choices matter.
Cable railing systems offer an open, modern look and don’t block views. Install stainless steel cable runs horizontally through posts, tensioned with turnbuckles or swage fittings. Cable spacing must meet the 4-inch sphere rule, which typically means runs spaced 3 to 3.5 inches apart. This system requires sturdy posts, usually steel or reinforced wood, because cable tension can exceed 200 pounds per run.
Glass panel railings provide wind protection and unobstructed sightlines. Use tempered safety glass at least 1/4 inch thick, mounted in aluminum or stainless steel channels. Glass panels are heavy (a 4×6 panel weighs around 40 pounds), so post spacing should be closer than standard wood railings, typically 4 feet on center max. Check local codes: some jurisdictions require laminated glass for fall protection.
For a craftsman or traditional aesthetic, build a top and bottom rail system with vertical 2×2 balusters. Paint or stain the railing a contrasting color from the deck surface, white railings on a gray deck, or dark bronze against natural wood. Many builders reference Fine Homebuilding for advanced railing details, including newel post construction and code-compliant baluster spacing.
Horizontal slat railings use 1×4 or 1×6 boards laid flat, spaced to meet code. This style works well with modern or mid-century designs. Attach slats to the inside or outside face of posts using stainless steel screws, and seal all end grain to prevent moisture intrusion.
If the deck is low to the ground and doesn’t require a guardrail, consider a decorative border rail or knee wall. Build a short wall (12–18 inches tall) from the same material as the deck, capped with a flat 2×6 or composite trim board. This defines the edge without blocking views and provides a subtle safety barrier for kids or pets.